Create your first Chatbot
You can use any of the supported programming languages to create your first chatbot. This documentation currently supports Python, JavaScript and Golang.
As mentioned before, almost all of the SDK languages with the exception of Python are maintained by the community and not officially supported by Sarufi. If you find any issues with the SDK, please create an issue in the respective GitHub repository. Furthermore, if you see missing documentation, typos or bugs in any of the SDKs, feel free to contribute.
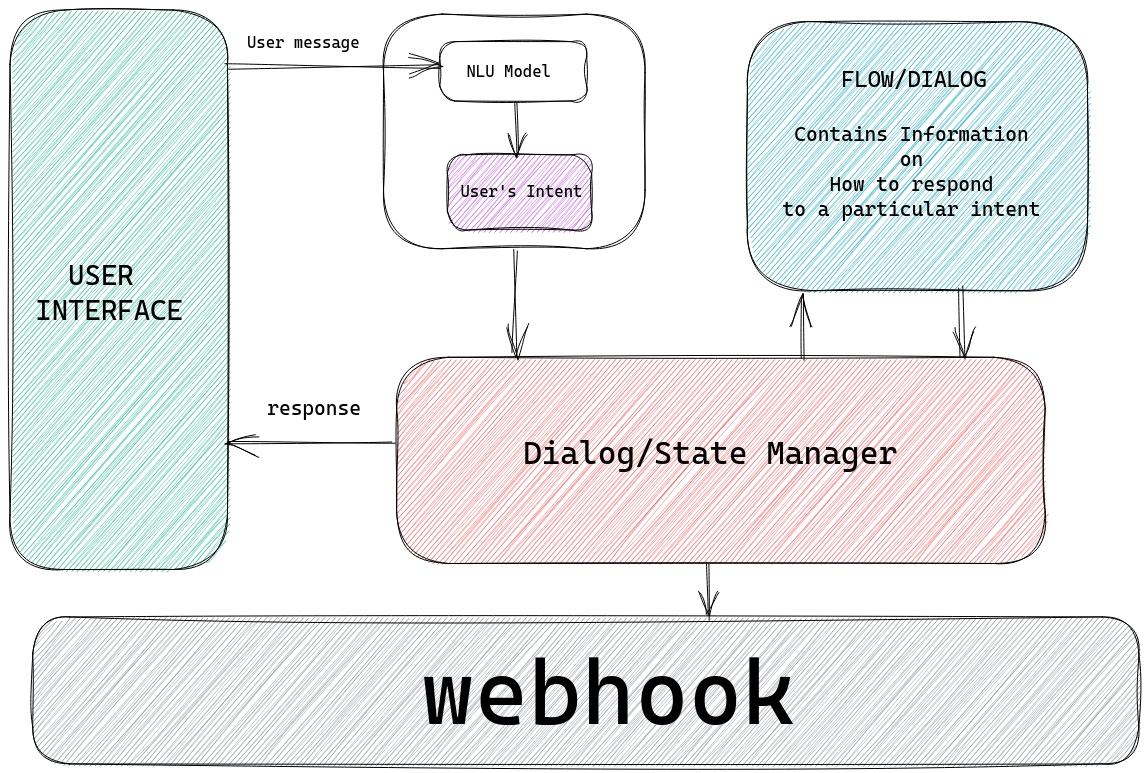
Draft Architecture
Before we start coding, let's first draft the architecture of our chatbot. Here is an oversimplified version of the architecture for our chatbot. Sarufi will handle intents training, intent inference, and dialog management. We will be handling the application logic and the user interface.
Installations
Select your language of preference to get instructions on installing SDK
- Python
- JavaScript
- Golang
python -m venv chatbot
source chatbot/bin/activate
pip install --upgrade sarufi
npm install sarufi
go mod init chatbot
go get github.com/sarufi-io/sarufi-golang-sdk
Sign up to Sarufi.io
To use the Sarufi.io SDK, you'll need to create an account on the Sarufi.io website. Here's how:
Go to the Sarufi.io website and click on the "Sign Up" button in the top right corner of the screen.
Choose your preferred sign-up method (email, GitHub, or Google).
Follow the prompts to complete the sign-up process.
Once you've signed up, log in to your Sarufi.io account.
Obtaining Your API KEY
After logging in to your Sarufi.io account, you can obtain your client ID and client secret by following these steps:
Go to your Sarufi.io profile settings page.
Scroll down to the
Authorizationsection.Here, you'll find your
API KEY.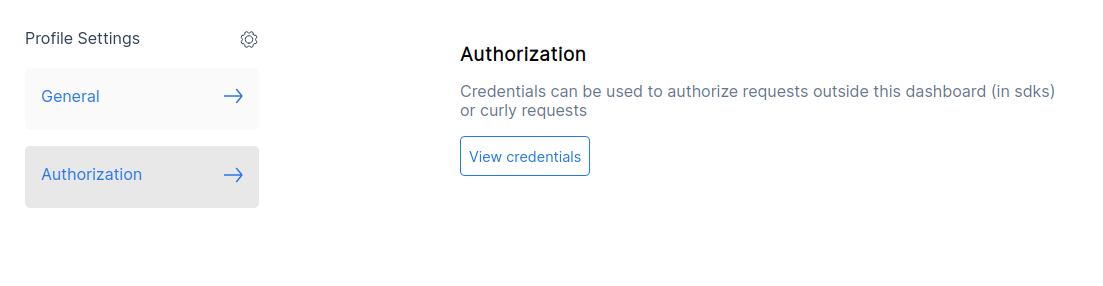
Copy these values and use them in your Sarufi.io SDK client configuration.
That's it! With your API KEY, you can now use the Sarufi.io SDK to interact with the platform.
- Python
- JavaScript
- Golang
from sarufi import Sarufi
sarufi = Sarufi(api_key='your API KEY')
import sarufi from 'sarufi'
sarufi.login({ api_key: YOUR_API_KEY })
var app sarufi.Application

app.GetToken("your_api_key")
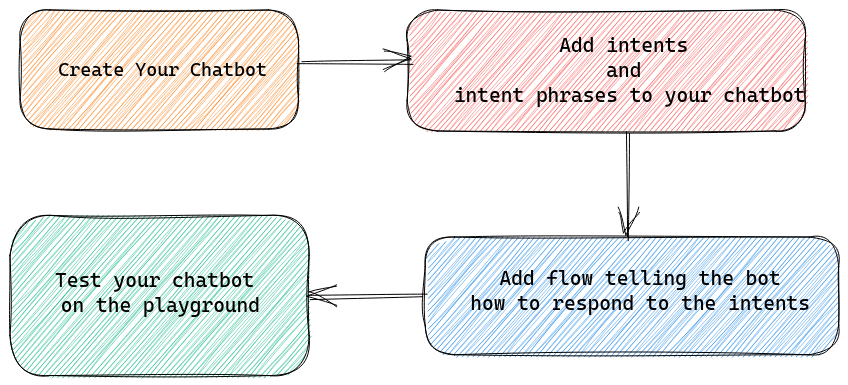
Create a Chatbot
Now that we have successfully authenticated with Sarufi, we can create an empty chatbot with 0 intents and 0 utterances.
The below image shows overview of the steps it takes to create your first chatbot with Sarufi.
Creating an empty chatbot
This is the first step in creating your first chatbot. You can use the following code to create an empty chatbot.
- Dashboard
- Supported SDKs
Creating a chatbot via the dashboard provides a way to create it either from scratch or from a knowledge base. You will be required to fill in important details about your chatbot.
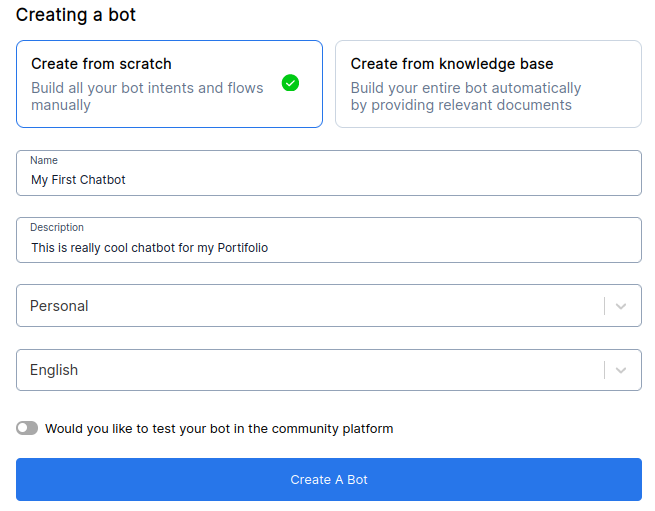
Lets start by creating a flow-based chatbot. When you select a language, your chatbot will be created with some default intents and flow. You can read more on how to create Knowledge base chatbot here
Currently we support the following SDKs:
- Python
- JavaScript
- Golang
>>> from sarufi import Sarufi
>>> sarufi = Sarufi(api_key='your API KEY')
>>> chatbot = sarufi.create_bot(name='My First Chatbot')
2022-09-12 15:42:02,821 - root - INFO - Creating bot
>>> chatbot
Bot(id=13, name=My First Chatbot)
First, we supply chatbot details.
The payload for the request
{
  "name": "YOUR AWESOME BOT NAME",
  "description": "PUT DESCRIPTION HERE",
  "industry": "YOUR BOT INDUSTRY",
  "intents": {},
  "flows": {},
}
Then we call the Sarufi API.
// call this first if you haven't logged in.
sarufi.login({ api_key: YOUR_API_KEY })

sarufi.createBot({bot: REQUEST PAYLOAD})
Response for successful bot creation:
{
  "success": true,
  "bot": {  "name": "YOUR AWESOME BOT NAME",
            "description": "PUT DESCRIPTION HERE",
            "user_id": "YOUR ID",
            "industry": "YOUR BOT INDUSTRY",
            "intents": {},
            "flows": {},
            "updated_at": "DATE THE BOT WAS LAST UPDATED",
            "id": "BOT ID",
            "model_name": "BOT MODEL NAME",
            "created_at": "DATE THE BOT WAS CREATED"
  },
  "chat": "({message: string, chat_id?: uknown}) => RETURNS CHAT RESPONSE"
}
visible_on_community := true // Set it to false if you don't want it visible on the playground

example_bot, err := app.CreateBot("Name of your bot", "Description", "Industry", visible_on_community)
if err != nil {
    log.Fatal(err)
}

fmt.Println(example_bot.Name)
The method of creating a bot differs in each SDK. Please observe the different naming conventions.
| SDK | Method used | Return Value |
|---|---|---|
| Python | create_bot() | Bot object |
| JavaScript | createBot() | JSON object |
| Golang | CreateBot() | Sarufi Bot Type |
Start a conversation with your Chatbot
Now that we have successfully created an empty chatbot, we can start a conversation with our chatbot and see how it responds. You can use the following code to start a conversation with our chatbot.
Here is an example of how to start a conversation with our chatbot.
- Python
- JavaScript
- Golang
| Class name | Method | Arguments |
|---|---|---|
| Sarufi | chat() | bot_id, chat_id and message |
| Bot | respond() | chat_id and message |
By default, chat_id is set to a random UUID. You can pass your own chat_id if you want to continue the conversation with the same user.
Here are examples on each method
- Chat method
- Respond method
  >>> from sarufi import Sarufi
  >>> sarufi = Sarufi(api_key='your API KEY')
  >>> sarufi.chat(bot_id=5, message='Hello')
  >>> chatbot = sarufi.get_bot(13)
  >>> chatbot.respond('Hey')
  2022-09-12 15:44:02,811 - root - INFO - Sending message to bot and returning response
  2022-09-12 15:44:07,078 - root - INFO - Status code: 200
  2022-09-12 15:44:07,078 - root - INFO - Message sent successfully
  #here is the response
  {'message': 'Intent for this message is missing in [FLOW]'}
You can either use sarufi.chat() or chatbot.chat() on the bot response.
| Class name | Method | Arguments | Return Type |
|---|---|---|---|
| Sarufi | chat() | bot_id, message and chat_id(optional) | JSON object |
| Bot | chat() | message,chat_id | JSON object |
You will need to pass the chat_id and message to the chat() method. By default, chat_id is set to a random UUID.
You can pass your own chat_id if you want to continue the conversation with the same user.
//chatbot.chat()
> const chatbot = await sarufi.getBot({id: 45})
> await chatbot.chat({message: "Hey"})
{
  message: 'Intent for this message is missing in [FLOW]'
}

//sarufi.chat
> await sarufi.chat({ message: 'Hey', bot_id: 1 })
To get a list of available bots use bot.GetBots(). This will return a JSON response with all your chatbots and their details. To get a specific bot, call bot.GetBot(bot_id). This will return a bot object.
To start a conversation, use bot.Respond("message", "message_type"). For now only text message types are supported:
if err = example_bot.Respond("Hey", "general"); err != nil {
    log.Fatal(err)
}

fmt.Println(example_bot.Conversation.Message)
As you can see, our chatbot is not able to understand the message we sent but replied us with a predefined response. This is because we haven't trained our chatbot yet. We will be training our chatbot in the next section.
Another cool way to test your chatbot is to use the Sarufi Playground. By Default when you create a chatbot, it is set to public. All you need to instantly test your chatbot is to go Sarufi Community playground and search for your chatbot.

Adding Intents and flow
We are going to create a bot that will help us with ordering a 🍕 pizza
Add Intent
Let's now create an intent that will help us order a pizza and also add some utterances to that intent. You can use the following code to create an intent and add some utterances to that intent.
To make more interactive, let's general intents like greets, order_pizza, goodbye and add some utterances to those intents.
- Python
- JavaScript
- Golang
>>> from sarufi import Sarufi
>>> sarufi = Sarufi(api_key='your API KEY')
>>> chatbot = sarufi.get_bot(13)
#We assign intents attribute a dict with intent name and and intents
# dict {<intent name>:[list of all related keywords to trigger the intent]}
>>> chatbot.intents = {
...     'greets': ['hey', 'hello', 'hi', 'howdy', 'hola', 'greetings', 'good morning', 'good afternoon', 'good evening'],
...     'goodbye': ['bye', 'goodbye', 'see you later', 'see you soon', 'see you', 'talk to you later', 'talk to you soon', 'talk to you'],
...     'order_pizza': ['I need a pizza', 'I want a pizza', 'order a pizza', 'I want to order a pizza']}
2022-09-12 15:55:06,696 - root - INFO - Updating bot
2022-09-12 15:55:07,972 - root - INFO - Bot(id=13, name=My First Chatbot)
#We get bot's intents
>>> chatbot.intents
{'greets': ['hey', 'hello', 'hi', 'howdy', 'hola', 'greetings', 'good morning', 'good afternoon', 'good evening'], 'goodbye': ['bye', 'goodbye', 'see you later', 'see you soon', 'see you', 'talk to you later', 'talk to you soon', 'talk to you'], 'order_pizza': ['I need a pizza', 'I want a pizza', 'order a pizza', 'I want to order a pizza']}
We are going to use Sarufi UpdateBot method. We pass it a dict with intents and bot_id.
> const chatbot = await sarufi.getBot({ id: 45 });
> const bot = {
  intents: {
    greets: [
      'hey',
      'hello',
      'hi',
      'howdy',
      'hola',
      'greetings',
      'good morning',
      'good afternoon',
      'good evening',
    ],
    goodbye: [
      'bye',
      'goodbye',
      'see you later',
      'see you soon',
      'see you',
      'talk to you later',
      'talk to you soon',
      'talk to you',
    ],
    order_pizza: [
      'I need a pizza',
      'I want a pizza',
      'order a pizza',
      'I want to order a pizza',
    ],
  },
};
 await sarufi.updateBot({ bot, id: chatbot.id });
// Create a string in JSON format
intents := `
{
    "goodbye": ["bye", "goodbye", "see ya"],
    "greets": ["hey", "hello", "hi"],
    "order_pizza": ["I need pizza", "I want pizza"]
}`

if err := example_bot.CreateIntents(intents); err != nil {
    log.Fatal(err)
}

// For changes to take effect
if err = app.UpdateBot(example_bot); err != nil {
    log.Fatal(err)
}
Try a conversation after adding intents
Now that we have successfully added some intents and utterances to our chatbot, let's start a conversation with our chatbot and see how it responds. You can use the following code to start a conversation with our chatbot.
- Python
- JavaScript
- Golang
>>> chatbot.respond("Hey")
2022-09-12 15:56:16,078 - root - INFO - Sending message to bot and returning response
2022-09-12 15:56:17,279 - root - INFO - Status code: 200
2022-09-12 15:56:17,279 - root - INFO - Message sent successfully
{'message': 'Intent for this message is missing in [FLOW]'}
> await chatbot.chat({message: 'Hey'})
if err = example_bot.Respond("Hey", "general"); err != nil {
    log.Fatal(err)
}

fmt.Println(example_bot.Conversation.Message)
You might wondering if we trained our chatbot, why doesn't it respond to us. This is because we haven't given it a conversation flow showing it how to respond to the user. We will be adding a flow in the next section.
Adding a flow
The flow is a directed graph that defines the conversation flow between the user and the chatbot. Flow is defined using the JSON format where each node is an intent and each edge is a response to the user message & the next intent to be triggered.
You can have nodes that are not intents. In that case, the node will be treated as a response to the user message. If you want to end the conversation, you can add a node with the name end.
Let's now add a flow to our chatbot. You can use the following code to add a flow to our chatbot.
- Python
- JavaScript
- Golang
>>> chatbot.flow = {
...     'greets': {
...         'message': ['Hi, How can I help you?'],
...         'next_state': 'end'
...     },
...     'order_pizza': {
...         'message': ['Sure, How many pizzas would you like to order?'],
...         'next_state': 'number_of_pizzas'
...     },
...     'number_of_pizzas': {
...         'message': ['Sure, What would you like to have on your pizza?'],
...         'next_state': 'pizza_toppings'
...     },
...     'pizza_toppings': {
...         'message': ['Cool, Whats your address ?'],
...         'next_state': 'address'
...     },
...     'address': {
...         'message': ['Sure, What is your phone number ?'],
...         'next_state': 'phone_number'
...     },
...     'phone_number': {
...         'message': ['Your order has been placed.', 'Thank you for ordering with us.'],
...         'next_state': 'end'
...     },
...     'goodbye': {
...         'message': ['Bye', 'See you soon'],
...         'next_state': 'end'
...     }
... }
> const chatbot = await sarufi.getBot({ id: 45 });
> const bot = {
  flows: {
  "greets": {
    "message": [
      "Hi, How can I help you?"
    ],
    "next_state": "end"
  },
  "order_pizza": {
    "message": [
      "Sure, How many pizzas would you like to order?"
    ],
    "next_state": "number_of_pizzas"
  },
  "number_of_pizzas": {
    "message": [
      "Sure, What would you like to have on your pizza?"
    ],
    "next_state": "pizza_toppings"
  },
  "pizza_toppings": {
    "message": [
      "Cool, Whats your address ?"
    ],
    "next_state": "address"
  },
  "address": {
    "message": [
      "Sure, What is your phone number ?"
    ],
    "next_state": "phone_number"
  },
  "phone_number": {
    "message": [
      "Your order has been placed.",
      "Thank you for ordering with us."
    ],
    "next_state": "end"
  },
  "goodbye": {
    "message": [
      "Bye",
      "See you soon"
    ],
    "next_state": "end"
  }
}
};
 await sarufi.updateBot({ bot, id: chatbot.id });
// create a string in JSON format
newFlow := `
{
     "greets": {"message": ["Hi, How can I help you?"], "next_state": "end"},
     "order_pizza": {
     "message": ["Sure, How many pizzas would you like to order?"],
     "next_state": "number_of_pizzas"
 },
     "number_of_pizzas": {
     "message": [
         "Sure, What would you like to have on your pizza?",
         "1. Cheese",
         "2. Pepperoni",
         "3. Both"
     ],
     "next_state": "choice_pizza_toppings"
 },
     "choice_pizza_toppings": {
     "1": "pizza_toppings",
     "2": "pizza_toppings",
     "3": "pizza_toppings",
     "fallback_message": ["Sorry, the topping you chose is not available."]
 },
     "pizza_toppings": {
     "message": ["Cool, Whats your address ?"],
     "next_state": "address"
 },
     "address": {
     "message": ["Sure, What is your phone number ?"],
     "next_state": "phone_number"
 },
     "phone_number": {
     "message": ["Your order has been placed.", "Thank you for ordering with us."],
     "next_state": "end"
 },
     "goodbye": {"message": ["Bye", "See you soon"], "next_state": "end"}
}`

if err = example_bot.CreateFlows(newFlow); err != nil {
        fmt.Println(err)
    }

app.UpdateBot(example_bot) // for changes to take effect
Conversation with our chatbot after adding flow
Now that we have successfully added a flow to our chatbot, let's start a conversation with our chatbot and see how it responds. You can use the following code to start a conversation with our chatbot.
>>> chatbot.respond('Hey')
{'message': ['Hi, How can I help you?']}
>>> chatbot.respond('Bye')
{'message': ['Bye', 'See you soon']}
>>> chatbot.respond('I want to order pizza')
{'message': ['Sure, How many pizzas would you like to order?']}
>>> chatbot.respond('3')
{'message': ['Sure, What would you like to have on your pizza?']}
>>> chatbot.respond('tomato')
{'message': ['Cool, Whats your address ?']}
>>> chatbot.respond('123, Main Street, New York')
{'message': ['Sure, What is your phone number ?']}
>>> chatbot.respond('+255783483934')
{'message': ['Your order has been placed.', 'Thank you for ordering with us.']}
You can see that our chatbot is able to understand the user message and respond to the user message. This is because we have trained our chatbot with intents and utterances, and w added a flow to our chatbot.
Conclusion
In this tutorial, we have learned how to create a chatbot using Sarufi. We have also learned how to train our chatbot with intents and utterances and also how to add a flow to our chatbot. We have also learned how to start a conversation with our chatbot and how to respond to the user's message.