Messenger
Messenger is a messaging app and platform developed by Facebook, Inc. It allows users to send text messages and voice messages, make voice and video calls, and share images, documents, user locations, and other media.
Messenger is one of the most popular messaging apps in the world. It has over 2 billion active users and is available in 120 different languages.
How to connect to Messenger
To get started using this blueprint, you will need credentials which you can get from the Facebook Developer Portal after creating an app. Note that the bot will be used on a page so you will need to create a page.
Here are steps to follow for you to get started:
- Go to your apps.
- Create an app.
- On
Which use case do you want to add to your app?, select Other >> Next. - Select Business >> Business (it will prompt you to enter basic app information)
- It will ask you to add products to your app. Add Messenger.
- Create a page if you do not already have a page.
- Get an
access token.
Getting Started
Deploying your Messenger bot can be either done using either Sarufi Dashboard or your own server. We are going to cover both ways.
- Sarufi Dashboard
- Custom Deployment
The Sarufi Dashboard provides a quick way to deploy your bot. You can deploy your bot in just a few clicks. You can also use it for bot management, viewing bot logs and much more. To get started, you will need to have a Sarufi account.
Steps:
Log in into your Sarufi account.
Go to your Dashboard to create a bot. Click
Create Botbutton. Enter your bot name and clickCreate BotbuttonAdd messenger credentials
Navigate to Settings >> Integrations >> Facebook Messenger. Enter your page access token and Verify token. Click the
Savebutton. Then clickDeploy.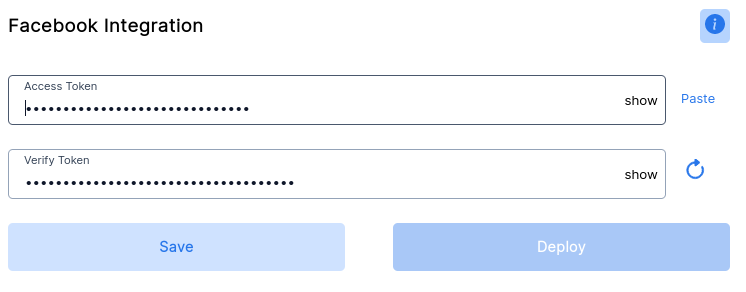
Wait for your job to finish. Once done, you will have a webhook URL presented to you. Copy the URL and follow the steps about setting up a messenger webhook here.
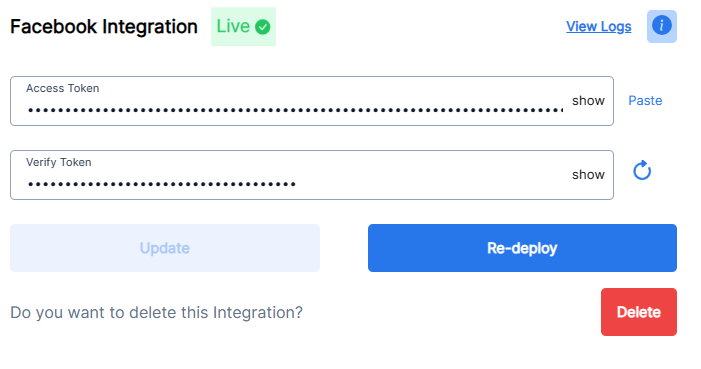
In case you want to change some of your credentials, just update your credentials in your dashboard and click
Update. ThenRe-deployagain.You can view your bot logs by clicking
View Logs.
This section covers how you can set up your own server to deploy your bot. We are going to use Python as our programming language. A guide for other languages will be added soon.
We are going to cover the workflow of either using ngrok or Replit to deploy our bot.
The main library used in the deployement is pymessenger.
- Using Replit
- Using Ngrok
Replit provides an in-browser IDE and compute resources to develop and host applications from a web browser. It is an online IDE which means you can access it from any modern web browser without having to install or configure anything. It is a good place to deploy your bot.
Steps
We are going to cover the steps briefly here.
Log into your Replit account.
Fork Sarufi Bot repository deployed on Messenger.
Navigate to
Tools-->Secretsto create environment variables. As a reminder, we have discussed how to get page access token in the Introduction. For Sarufi, a guide is available here.Create |Key | Description| |:---|:---| |SARUFI_API_KEY| Your sarufi API key| |PAGE_ACCESS_TOKEN| Your facebook page token| |SARUFI_BOT_ID| Id of bot to be deployed| |VERIFY_TOKEN| A random string to be used as verification token|
Run your REPL
After adding the secret keys, click
Run. A small webview window will open up with a url that looks likehttps://{your REPL name}.{your Replit username}.repl.co. Copy the url as it will be needed when setting up the webhook.Finish setup
To finalize the process, we are going to set up the webhook and subscribe to its fields. Read Finalize Messenger Setup.
Test your bot
Open Messenger and search for your page name. Send messages to it. The messages will be redirected to your bot. Here is the sample of our PizzaBot deployed. You can wiew a sample of our PizzaBot here.
This section illustrates how to use Ngrok to create a webhook. Ngrok is a multiplatform tunnelling, reverse proxy software that establishes secure tunnels from a public endpoint such as the internet to a locally running network service while capturing all traffic for detailed inspection and replay.
Steps
You will have to modify some commands shown here to adapt to your working environment. Commands like python3 and pip3 will depend on your environment. You may have to use python and pip instead.
Make sure you have ngrok installed on your machine.
Make project folder and virtual environment
Make a project folder named
messenger-bot. Navigate into it and create a virtual evironment namedsarufi-messenger. Activate the environment.This is the directory that will hold our project. You can name it anything you want.
mkdir 'messenger-bot'
cd 'messenger-bot'
Make Virtual Environment
Using virtual environment is a good practice, so we are going to create one. You can read more on why a virtual environment is advantageous here. The required packages should be installed in the environment.
Unix based systems
Install virtual environment
This step is optional as you may have a Python virtual environment already installed. If not, you can install it by running the command below.
sudo apt install python3-venvCreate virtual environment and activate it
python3 -m venv sarufi-messenger
source sarufi-messenger/bin/activate
Windows
Install virtual environment
This step is optional as you may have python virtual environment already installed. If not, you can install it by running the command below.
pip install virtualenvCreate virtual environment and activate it
virtualenv sarufi-messenger
.\sarufi-messenger\Scripts\activate
Clone the repo and install requirements
git clone https://github.com/Neurotech-HQ/sarufi-messenger-blueprint.gitMake sure you are in activated environment, then run the following
cd sarufi-messenger-blueprint
pip3 install -r requiremnts.txt
Add credentials
We are going to keep our credentials in an
.envfile. You can use either a text editor or command line to create it. As a reminder, we have covered how to get an access token for the page. For the Sarufi API key, follow this guide to get sarufi credentials.The contents of the file should be the following.
SARUFI_API_KEY=Your sarufi API key
PAGE_ACCESS_TOKEN = Your facebook page token
SARUFI_BOT_ID= Id of bot to be deployed
VERIFY_TOKEN = A random string to be used as verification tokennoteThe verification token is a random string. It is possible to create a random string and use it as your verification token. You can use any random string but please ensure you don't lose it because you will need to use the verification token when setting up the webhook.
Start the server and ngrok
Run the script to start the server.
python3 main.pyStart ngrok
This will create a public url to access the local server. The url looks like
https://xxxxxxxxxxx.ngrok.io. We will use this URL to set up our webhook../ngrok http 8000
Note:Keep the port number the same as used inmain.py.Running the chatbot
Open Messenger and search for your page name and send messages to it. The messages will be redirected to your bot. View a deployed sample of our PizzaBot here.
Getting Sarufi credentials
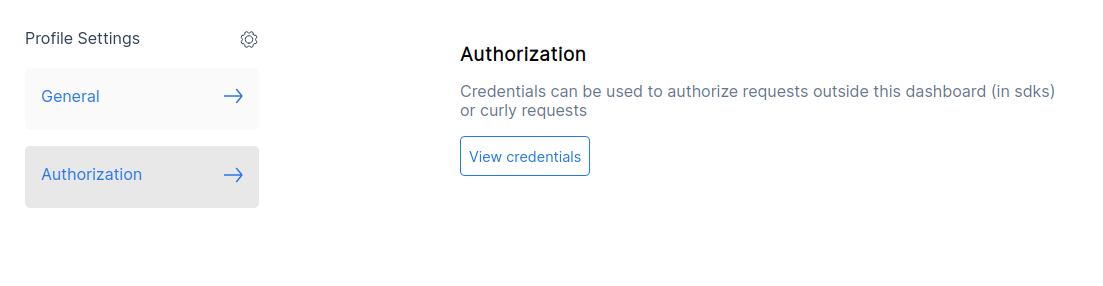
To authorize our chatbot, we are are going to use authorization keys from Sarufi. Login into your Sarufi Account. Go to your Profile to get your API key.
Finalize Messenger Setup
We are going to finalize our setup process by setting up the webhook and subscribing to the messages and messaging_postback.
Setting webhook
After starting ngrok, you will have a public URL to access the local server. The url looks like
https://xxxxxxxxxxx.ngrok.io. Navigate into your Meta developer account. In the webhooks section, clickMessenger>>Settings.
Scroll down to webhook section of messenger, click
Add Callback URL. Then paste the provided URL into the URL section. Copy theVERIFY_TOKENand paste it into theverify tokenfield in messenger >> Verify and save.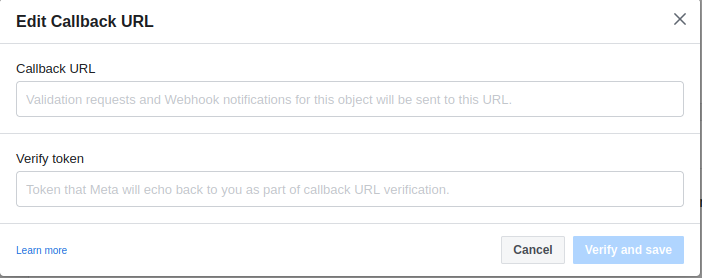
Webhook field subscription
We have to subscribe to webhook fields in order to receive messages sent by user. We will subscribe to the
messagesandmessaging_postbacktopics. Scroll down to webhook section and clickAdd subscriptions. Then selectmessagesandmessaging_postback>> Save.
Test Your Messenger ChatBot
Here is a demonstration of the PizzaBot deployed in Messenger.