Webhook integration
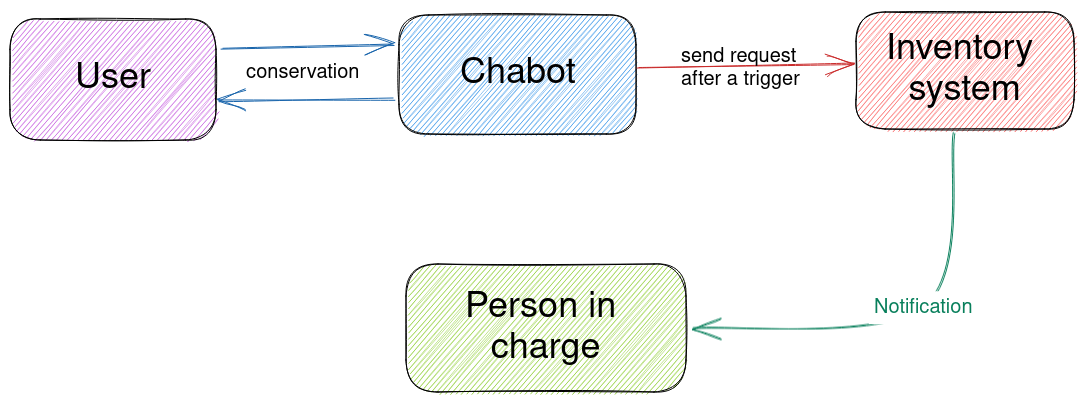
As our PizzaBot has the ability to handle conversations as we need it to, we can add extra functionality to let it interact with other systems, such as databases, APIs, and third-party applications. This is possible by utilizing Sarufi's webhook functionality to automate workflows. This will make our previous chatbot more powerful and useful. We can integrate webhooks into our chatbot to handle things like payments, update inventories, and update delivery tracking systems.
Webhooks
A webhook is an HTTP-based callback mechanism that allows two systems to communicate in real-time. It is triggered when an event occurs, such as an order confirmation. When the event is triggered, the webhook sends a request to a specified URL, which can be used to trigger an action, such as updating a database, sending a payment push, updating a delivery system, or sending a message notification.
Remember that a webhook only communicates one way!
All you have to do is specify which states should trigger the webhook and set the webhook URL in Sarufi.
Preparations🛣
With our PizzaBot, we will set up the webhook to send a person in charge a notification of the new confirmed order.
Steps:
Set up a public URL endpoint. This can be either a webserver or a cloud-hosted web service. Make sure you have a domain name set up.
Set Trigger Intents
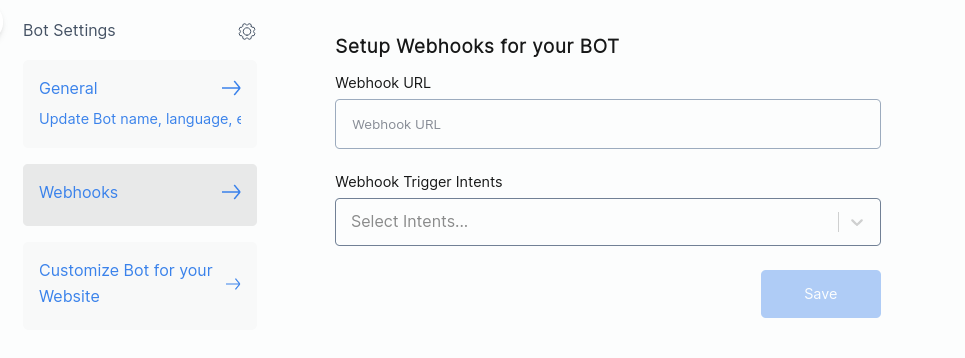
Navigate to the Sarufi dashboard --> Settings --> Webhook. Select the intents that will trigger sending of data to your webhook URL, then click save.
Process received data in your endpoint. This is specific to your setup.
Optionally, send requests to other services to handle the message.
Implementation🛫
An option is to use Flask to set up your server and Twilio to send message notifications to alert the operator when a new order is created.
You can use Replit or Ngrok to make your server available online. The webhook is based on our PizzaBot we have been working on.
We will make changes in our bot. We will add a choice to let the user confirm the order.
Adding Choices in the flow
Here is an updated flowchart of our chatbot.
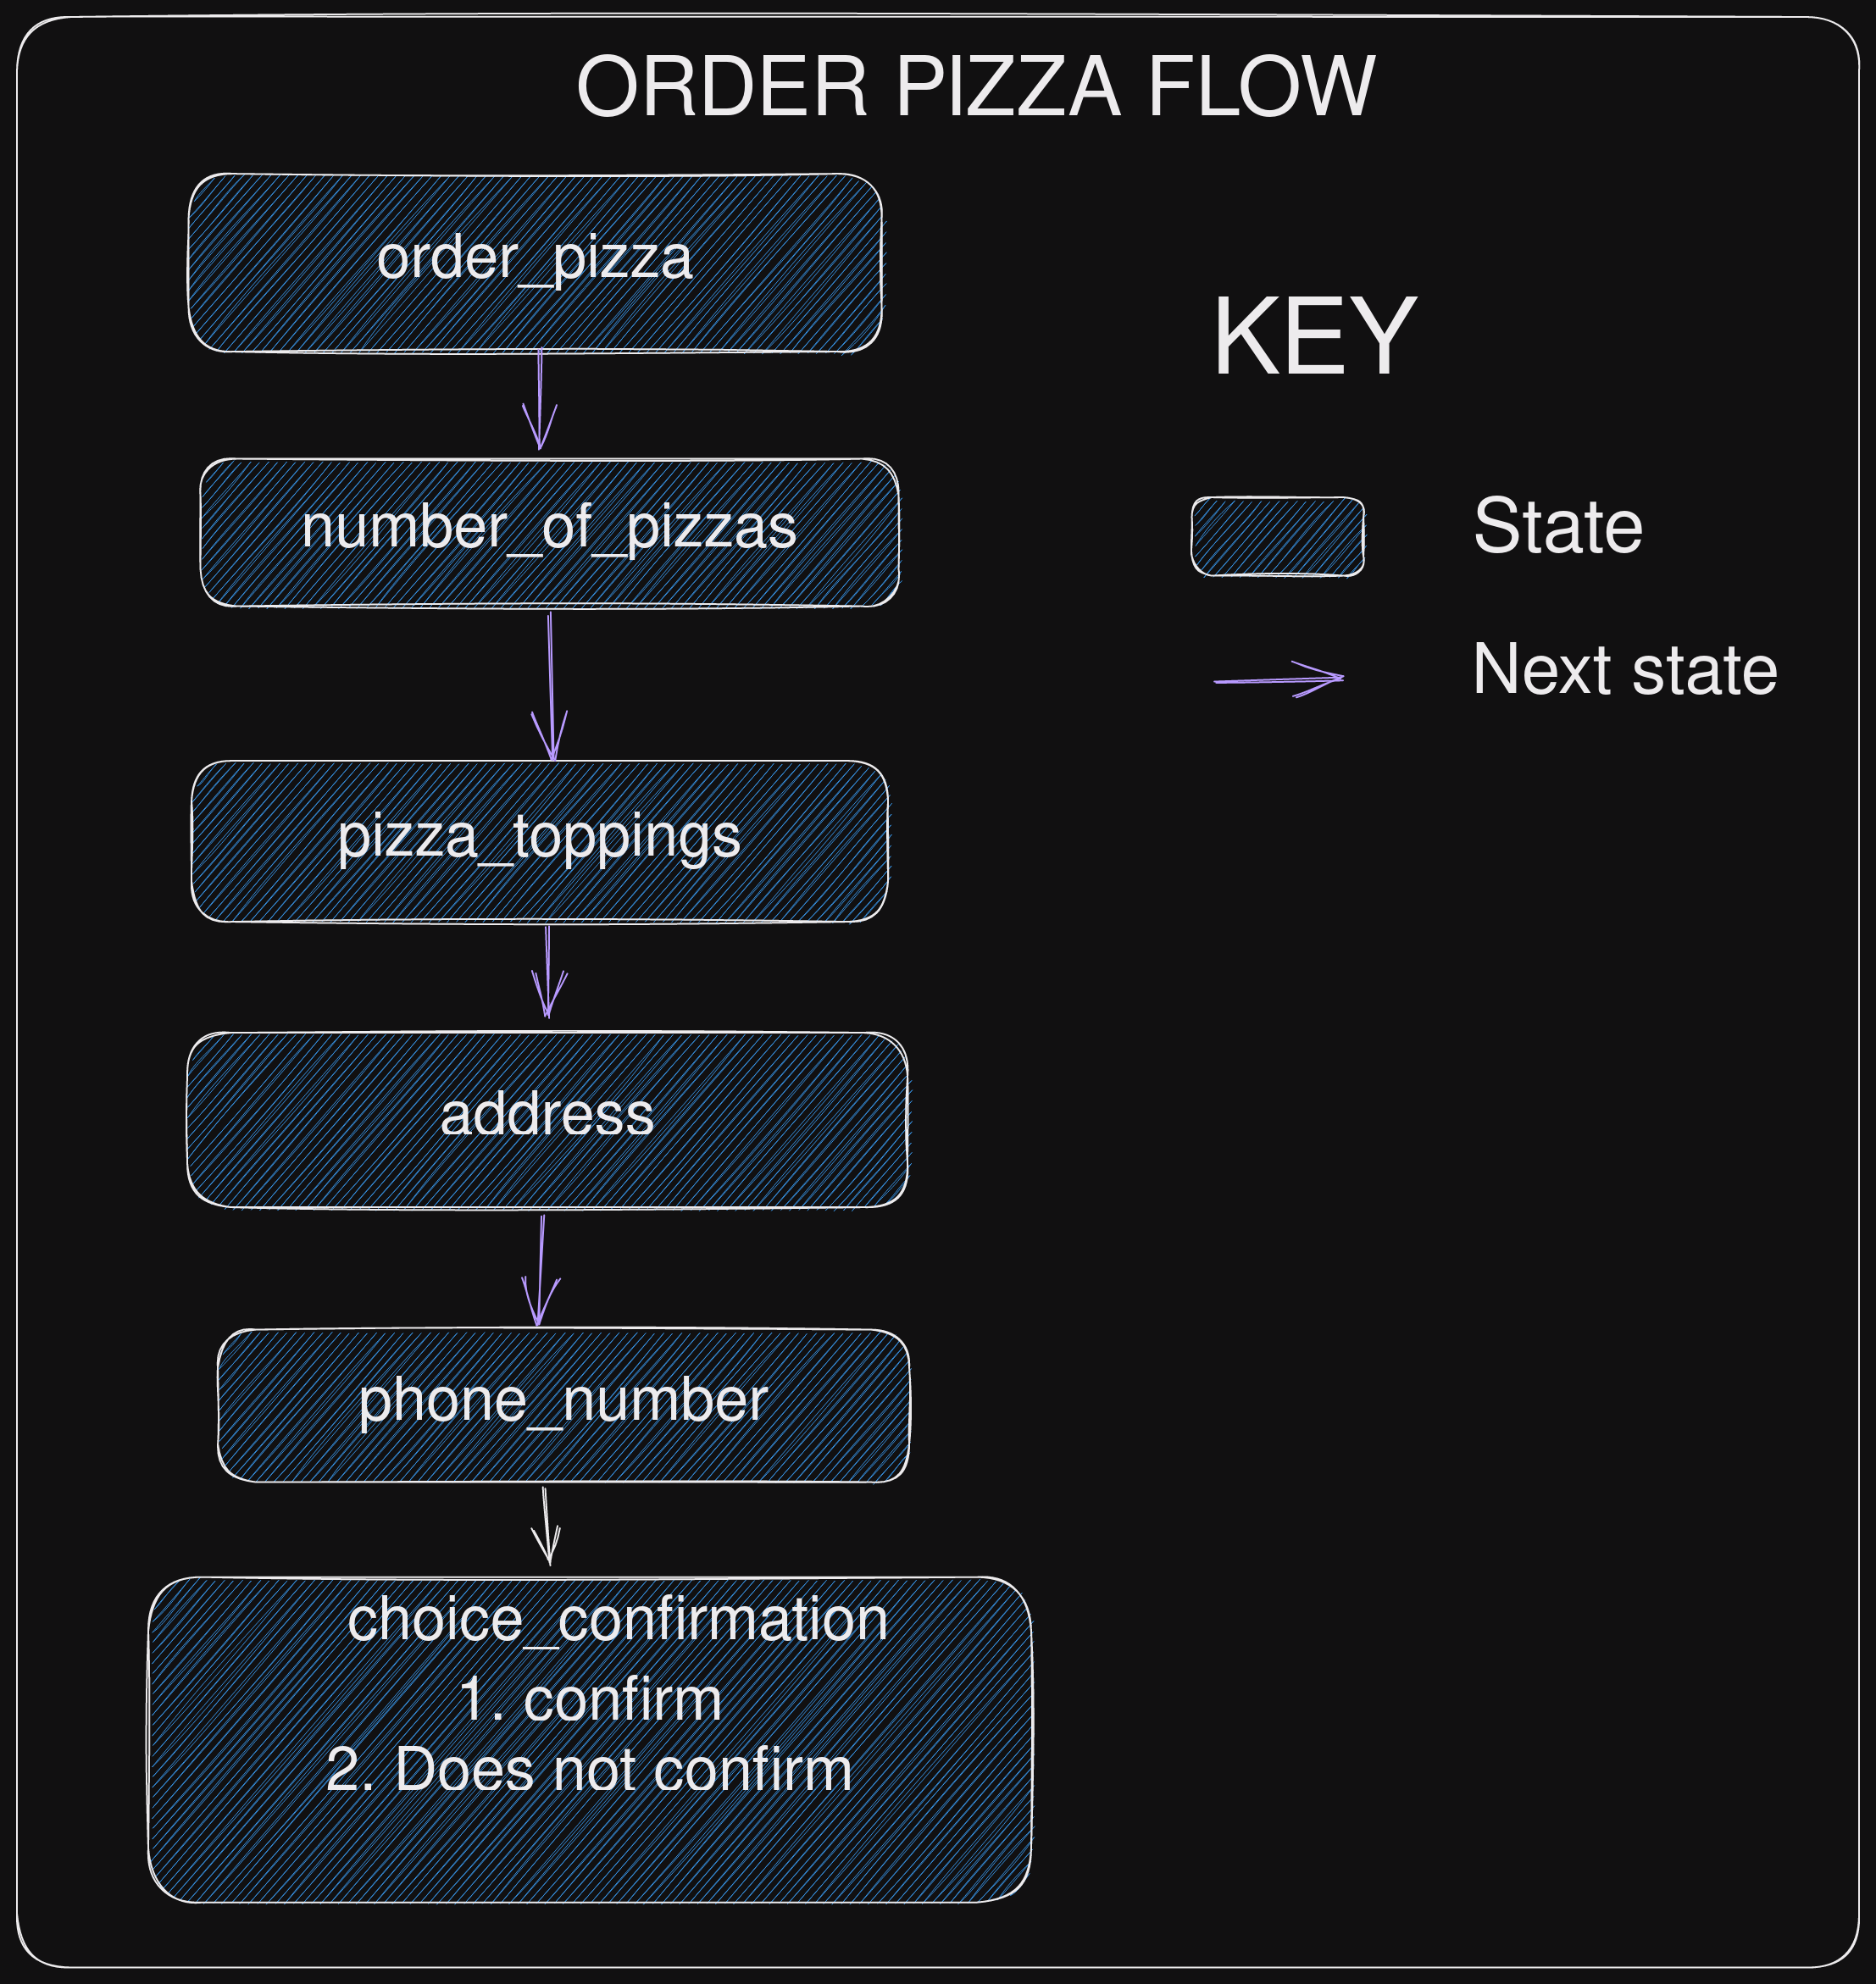
The choice menu ensures that the user can only choose from the provided options. In case they enter something else, the fallback message will be displayed to the user.
We will modify the message of the bot at the phone_number state to let user know that they have to select from the displayed choices.
To add a choice menu, in the Sarufi dashboard navigate to your state which is to be connected to the choice menu. Click the connect button --> Connect to Choice Menu.
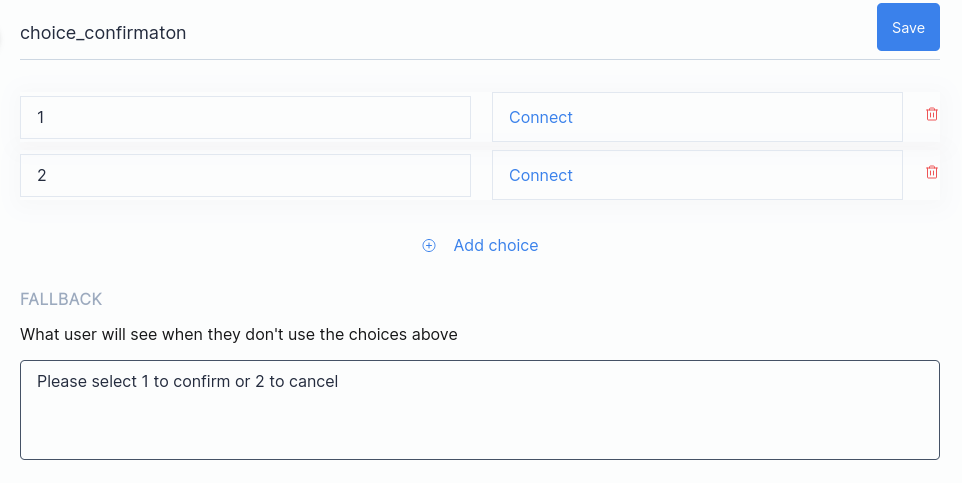
You will have to create a new choice menu A small window will pop up prompting for details. Here are the fields which need to be added:
Choice name
Choices start with
choice_. Our choice will be calledchoice_confirmation.Fallback message
This a message that will be displayed when user choses an invalid choice.
Add a choice
Each choice has a
textand a connectedstate.textcorresponds to the user input andstateis the state which the bot will transition to when the user selects that choice.1 will be the choice to confirm the order and 2 will be the choice to cancel the order.
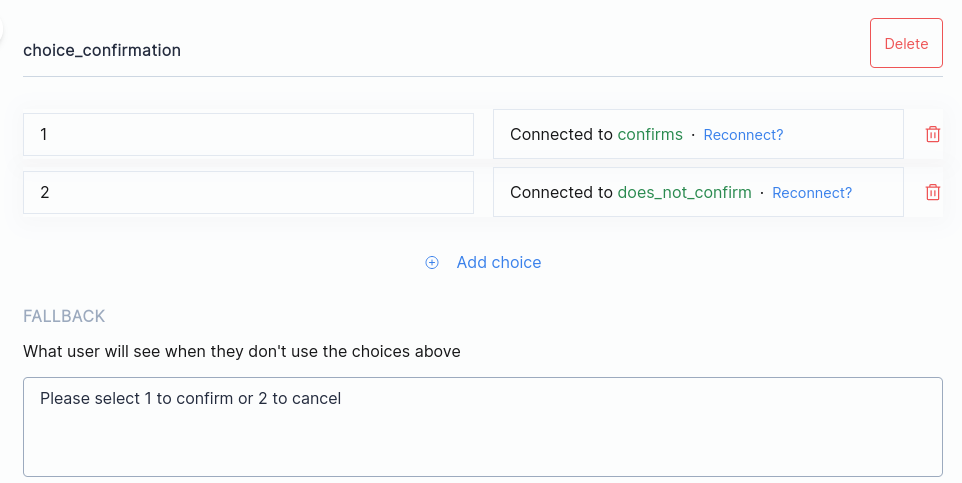
With our choices in place, we need to connect each choice to a state. We will start with choice
1. Click onConnect➡️Create a state➡️ and enter a state name, for example customer_confirms.We will be using a text message component for this. Select
Text componentthen add a message likeThank you for ordering with us, you order will be available soon. Click Save afterwards. Do the same for choice2. Finally, click Save.If everything went successful, it will look like this.
The Journey✈️
In our journey, we are going to set up a webhook server. You can use either Ngrok or Replit to make your local server publicly available to the internet.
- Replit
- Ngrok
Steps to set up Replit:
1. Create repository
Fork the PizzaBot sample webhook repository into your Replit account.
2. Create secret keys. They are listed in the table below.
| Secret key | Description |
|---|---|
| phone_number | "Your twilio phone number" |
| twilio_SID | "Your Twilio SID" |
| twilio_assigned_phone_number | "Youe twilio assigned number" |
| twilio_auth_token | "Twilio auth token" |
3. Obtain the Webhook URL
Start your Flask server to obtain a public URL. Afterwards, a small web preview window will open up with the URL. It will be in the format of https://{your repl name}.{your replit usermae}.repl.co.
4. Set up the webhook in Sarufi
Navigate to the Sarufi dashboard --> settings --> Webhook. Select the intents which will trigger sending data to your webhook URL. Click save.
Steps to set up Ngrok:
1. Run the command below:
```bash
git clone https://github.com/jovyinny/sample-webhook.git
```
2. Install requirements
There are a few packages required to setup our webhook. We can install them using the command below:
```bash
cd sample-webhook
pip install -r requirements.txt
```
3. Create an .env file
We are going to create an .env file to hold our secret keys from Twilio securely. This is not committed into the Git repository to prevent the keys from being leaked.
```text
phone_number="Your twilio phone number"
twilio_SID="Your Twilio SID"
twilio_assigned_phone_number="Youe twilio assigned number"
twilio_auth_token="Twilio auth token"
```
4. Run the website
```bash
python3 main.py
```
5. Start the Ngrok server
```bash
./ngrok http 5000
```
Note: Ensure that the port number is same as used in main.py.
6. Finish up
After running the command, copy the URL Ngrok provides. The url looks like this: https://xxxxxxxxxxx.ngrok.io.
7. Set sarufi webhook
With the URL from Ngrok, it's time to set up our new pizza order alert. Navigate to the Sarufi dashboard --> Settings --> Webhook. Select the intents that will trigger sending data to your webhook URL.
Click save.
Code Snippet
Here is a code example to demonstrate the usage of webhooks with Sarufi. It is easy to use webhooks with even multiple intents specified.
The only thing you need to know is the structure of the data being sent when a particular intent is triggered.
import os
from flask import Flask,request
from twilio.rest import Client
from dotenv import load_dotenv

# flask app
app=Flask(__name__)

load_dotenv()
# twilio
client=Client(os.environ.get("twilio_SID"),os.environ.get("twilio_auth_token"))

def send_notification(message:str):
  message = client.messages.create(
    body=message,
    from_=os.environ.get('twilio_assigned_phone_number'),
    to=os.environ.get("phone_number")
  )
  print("Message sent")


def extract_data(data:dict)->str:
  number_of_pizza=data.get("number_of_pizzas")
  toppings=data.get("pizza_toppings")
  address=data.get("address")
  phone_number=data.get("phone_number")

  # formated message
  message=f"🔔New order alert.\n A customer with phone number {phone_number} has placed an order of {number_of_pizza} pizza with {toppings} toppings to be delivered to {address}"

  return message

@app.route("/new-order",methods=["POST"])
def new_order():
  data=request.get_json()
  if int(data.get("choice_confirmation"))==1:
    print("new order confirmed")
    message=extract_data(data)
    send_notification(message)
  else:
    print("new order cancelled")
  return "Received"


if __name__ == "__main__":
  app(port=5000,debug=True)
Finish🛬
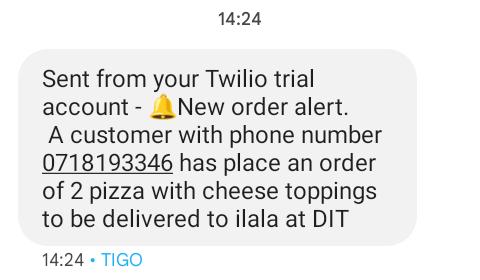
With everything set, let's order something from our chatbot.
Here is the notification message received from the bot after the order: